Drop down from 100 feet to 16
This plan is for the part of a wedding the say "I do". I want to float down on a slope gradually reaching 2mph from 16mph. The POI is in back of where they stand and it has a 5' elevation. So it pans up as it gets to the bottom.
I start next to the high point. You'd think it would just fly up to the first way but NO, my MA 2 drops strait down so close to the ground I have to about.
I tried everything to fix the plan on site with the web app to on the same tablet it didn't change anything. Is this a bug? This is just my rehearsal but the wedding is Saturday.
https://app.dronelink.com/john-s-kress/shared-9xlBoONTSQZNmrQDXdtx/plan/EZZuWZTRJsgEzbBUCpjN
Comments
16 comments
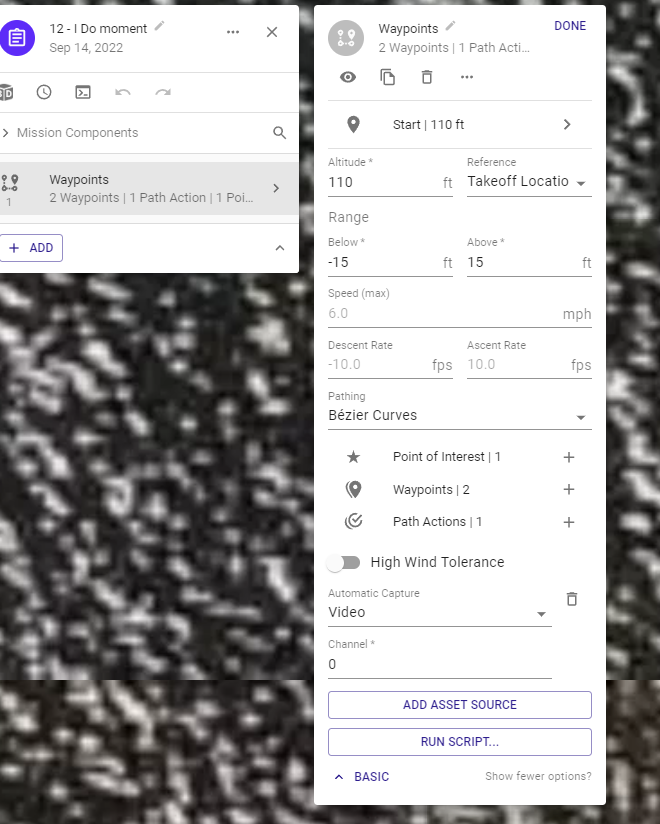
The waypoint function has an altitude setting of 16ft in the settings. It will start at that and then climb to the first waypoint. Change that and it should fix it for you.
Ok I was looking at this and couldn't work out what was going on, then I realised that you were launching off shore, and flying "UP" the beach, so therefore the surface of the beach is higher than the take off location, so lets say at WP B the surface of the beach is 20 feet ATL, then 16 feet ATL is going to be 4 feet below the surface of the beach!
So 2 possible options to solve the problem:
Hope the above makes sense and gets you all sorted for Saturday
I did this Barry, but it still does it...
did you try what i suggested
I just put the drone a few feet from me rather then fly to the top altitude. Above ground level is flagged/warning by the web app so I just leave it. I haven't tried it again in the field.
Can you share the updated version?
Try this plan and let me know if that gives you what you need
https://app.dronelink.com/barry-houldsworth/testing-and-training/plan/1vpomgNJiDPz55FnCYD0/fVcUUpMRhhKzzJ2dR5oz
I changed the altitudes in the settings (per my previous comment) and removed the video capture action that was set at 16ft. That might have been confusing it. I then made sure that A was at 110ft and B was at 16ft.
I also took the automatic capture off of the mission and put it on the first waypoint (A) so that it only captures the drop.
Hopefully, that gives you what you need.
If AGL is available with your plan you might try it. The warning is just so you are aware when using AGL the ESRI data used is not perfect and the actual altitude to the ground may vary so use with caution. I use AGL a good amount of the time and works great. However, I’ve been using it for almost two years and know the approximate tolerance in any area I’ve flown. I usually start a bit higher then run on Google earth and adjust as needed. The elevation change as Martin stated using ATL would need to be calculated for the destination. As discussed before when trying to descend almost straight up or down the drone may not be able get up to the speed you set. It can’t possibly go forward at 16 or even 6 mph when ascending down especially at a very short distance as this plan is. Only about 20’ from A to B waypoint and 100’ in altitude change. It should work but won’t be moving very fast. I tried changing a few things and the most speed I can get is about 3 mph.
I spent some time on this but I enjoy testing new things and different plans from other pilots. I tried several different ways to make it what I think looks good. Just to simplify it I removed the one marker and added the 16 foot altitude setting to waypoint B. Also moved both the waypoints A and B farther apart so there is more distance between both. Still only about 40’ so the ascent and descent is still very steep. I straighten the approach from reference pin so it lines up exactly with the approach and path. I Eliminated the two auto video captures and added a component list at the begging of plan. The first capture was only recording on the approach which was pointing nowhere and not serving any function. This way it will start recording on execution of mission while pointing at the house and run continuously till the end. Then you can edit any of the beginning part you don’t want. One ssue is if you run on DL mission preview and then on Google Earth you will see a big difference how it focuses on the POI. Since the plan is very short I’d suggest maybe at least trying again with this set up and see how it actually looks in the real world especially at the end when focusing on the POI. Then change the Altitude offset if needed. I think it looks better flying straight towards the house and eliminated almost all the rotation/ twitch from it. It looks good to me but hard to actually know exactly what your looking for. If this doesn’t work then no biggie. As mentioned before, there are many ways to set up a plan and it will depend on the pilots preferences and the look they want. Maybe this will help or give some ideas.
Good luck John.
https://app.dronelink.com/wyldwestaz/forum-missions/plan/xBp6OXlrfuNhiigzjKef/THqDcZoNDIugKtw7zrIN
Thanks, That looks great. I use automatic capture, it uses the camera settings in DJI Fly... for now. I will probably use it, or I may use DJI fly with active track on priest. The timing getting a mission engaged worries me.
Heremit happened again, almost crashed. A mission that started 3' above ground. Instead it went straight up to the highest point, then back down and started the mission.
It also disregarded any POIs I had.
https://app.dronelink.com/john-s-kress/shared-9xlBoONTSQZNmrQDXdtx/plan/fb9ogFHc0SKkMFReJVxZ
I can't trust this program on a job. I'll just have to you DJI active track.
Maybe it's this.
 I'll change it to 4'
I tried to figure out what you really wanted to do with the mission and got confused, to start as I didn't see an initial altitude set for takeoff.
Next, crashing is not at all surprising based on your settings. You are allowing the vertical height to off by 25 feet from the planned path while you are fling at about 4 feet above ground. This means you are permitting the done to descend 25 feet below course. That means crash. When flying that low set your vertical tolerance to be like 2 feet so the drone will abort mission before flying low off course. Since I really don't know the terrain, my numbers may be off.
As for POI I suggest using path actions (markers) and not waypoints. Keep waypoints for defining the path and markers (path actions) to define what happens. They can be placed anywhere so the POI will remain until control is taken back by the next marker. Make sure there is sufficient distance between your control points (path actions). Describing what you want to happen including details of terrain and expect AGL throughout the planned flight could help. Describing the path without use of words waypoints and markers could help--just want you really want to accomplish..
I was leaving the master waypoint altitude at default 100'
That would make sense. As far as the plan, as stated before you will probably have issues if trying to ascend almost straight up. The app is not really built to do this on a path. This ascent from waypoint “I” at 30’ to last waypoint “J” at 200’ is only traveling at total of about 3’ in distance and ascending up 170’. So the way it’s set up if it works it will basically start climbing almost straight up between those last two waypoints. Any path which is ascending up to a high altitude will usually need more distance between the two points. It may work depending on the drone and the drones ascent rate capability but always best to increase the distance on the path between those two points. If it works then great but something to consider when climbing very steeply. As far as not trusting the app, this is not a normal plan. The app works great but attempting to perform a function like which it is not designed to do may be tough.
As for the POI’s, I agree with David. I’d use Markers on the path instead so they can be moved along the path and give more control. Adding a second marker and attaching it to POI A will keep it focusing on POI A continuously until you want it to start Interpolating to POI B.
Sending a screen shot of mocked up path plan to show what I mean by adding the second marker to POI “A” This way it will stay on “A”all the way to marker 2 then start interpolating to the next POI. This should correct your POI problem. Good luck John.
Just ran the Ali’s House mission twice. No issues at all with my MA2. Only thing I changed was adding a second marker on the path like I mentioned for POI “A” so it stayed focused on it until just before the second POI. Then it interpolated to the second and looked good Hope it works out for you. Enjoy…
Please sign in to leave a comment.