What is the best way to orbit a rectangular location
Hi everyone,
I have a location that measures approx 150m by 75m and is heavily treed on two sides and has 4 storey residential buildings on another with a 2 storey industrial building on the final side. I plan to fly a grid mapping mission at 100ft (tallest tree is around 84ft) but I also want to fly an orbital path to generate some oblique imagery at the same height. The standard circlular orbit needs stretching out but, as we know you can't do that. So, what is the recommended approach that you Drone Link pro's would suggest?
Thanks in advance,
Paul
Comments
14 comments
I’m not a pro but you may want to look at linear mapping component. You can set the pitch, direction, overlap as well as other things like with a standard map. It can be set up to fly a rectangular shape a round the area while capturing photos. Otherwise you may be able to use a path component.
Mike,
Thanks for the contribution. Unfortunately I only have the Elite Plan so Linear Maps are unavailable to me.
I may have cracked it using a Waypoint mission (nice bezier curves) and point of interest...but still playing around in DL and the 3D views to check it works.
Always someone here to help if any questions. Enjoy.
Some good results can be had by setting waypoints and LARGE Corner Radius of curvatures + Straight flight path mode. It simulates a sweeping path for the rectangle and has smooth motion in flight, and conforms to your polygon - not a circle.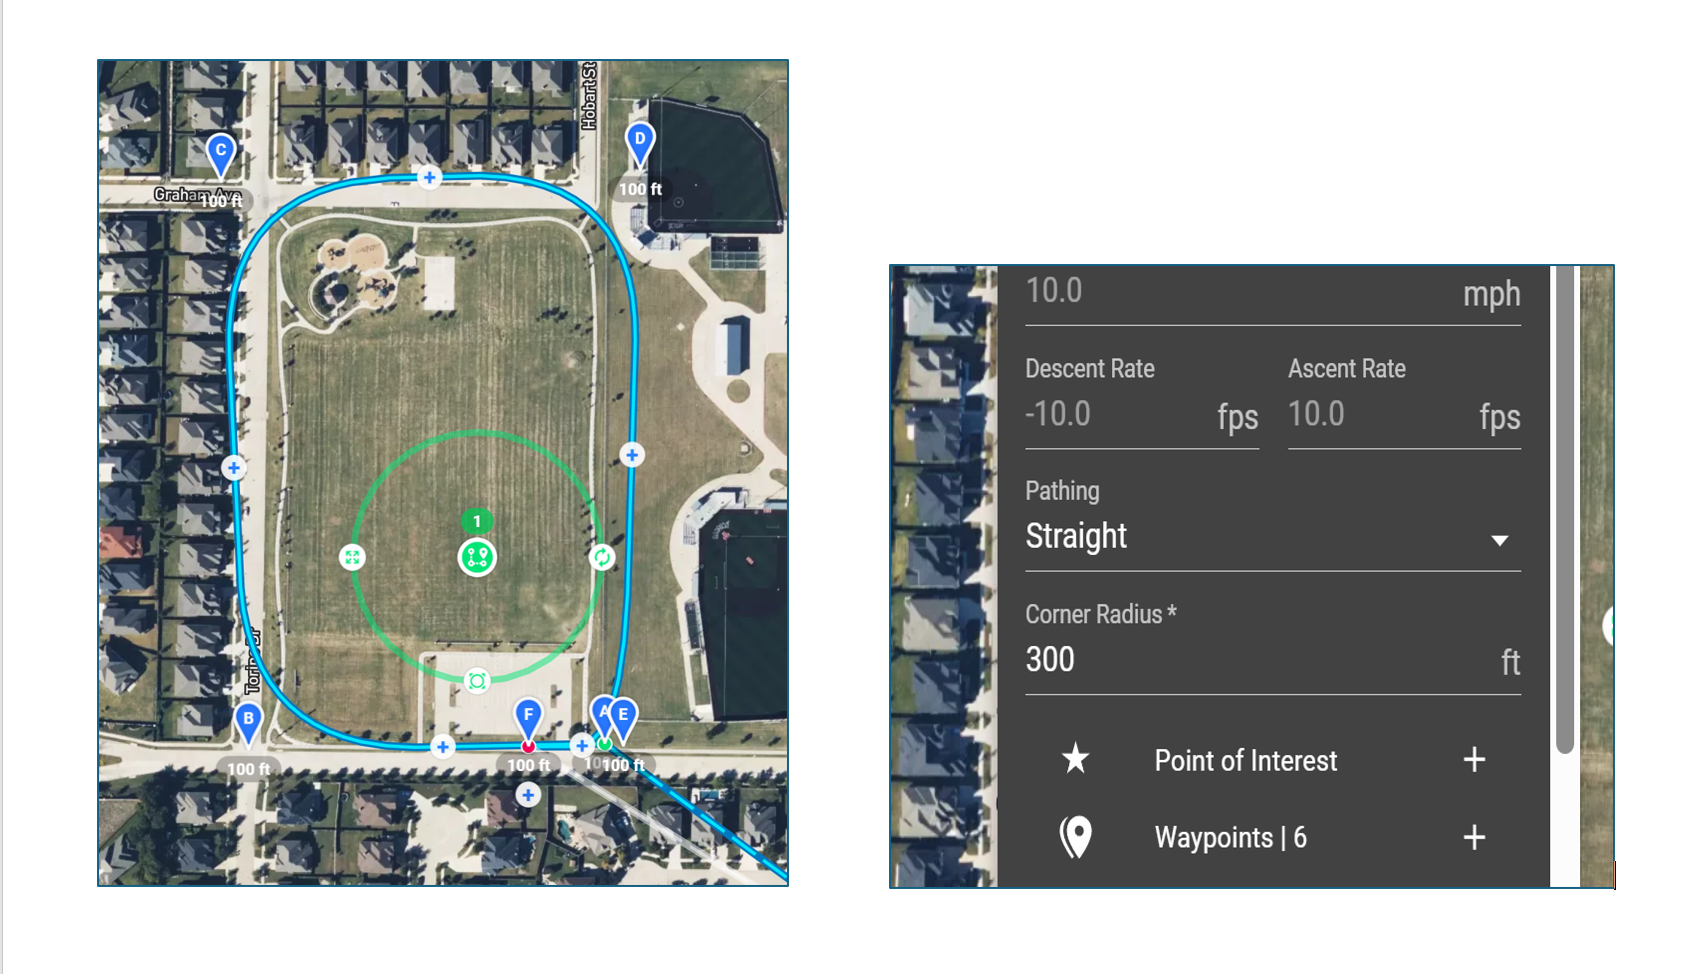
Hi Daniel,
That looks very similar to how I have plotted out my flight path but you don't appear to be using a point of interest. If you are flying sideways to take still photos of that area can it be done without a POI?
Instead of POI You could use a heading from Path setting. When Going Clockwise, you could set the drone heading to point 90 degrees off Drone Path (perpendicular to drone path). -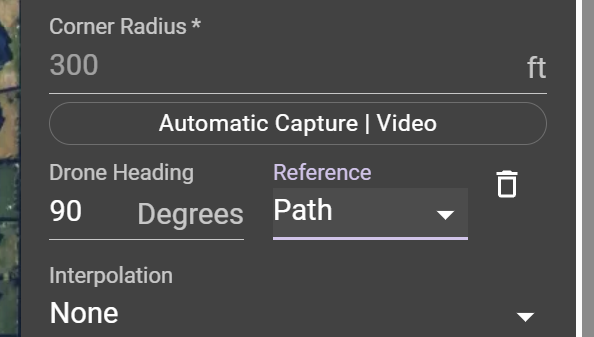
Just remember to not set the Max speed too high depending on altitude and distance from the object being captured. Flying sideways too fast could cause motion blur. You can try with a few different intervals and run the mission preview with the captures toggled on and it will show where they will be taken along the path and the spacing.
Daniel, Mike,
Many thanks. Every day is a learning day. Great idea.
Paul
Even after using DL a lot for over 4 years I still haven’t used every feature/ function. I believe I have created and flown all available components in the Web app just to see how they work. The only functions which I still haven’t tried every one of are the On the Fly missions and modes. It’s a very powerful app and I’m still learning new stuff. Enjoy.
Daniel, Mike,
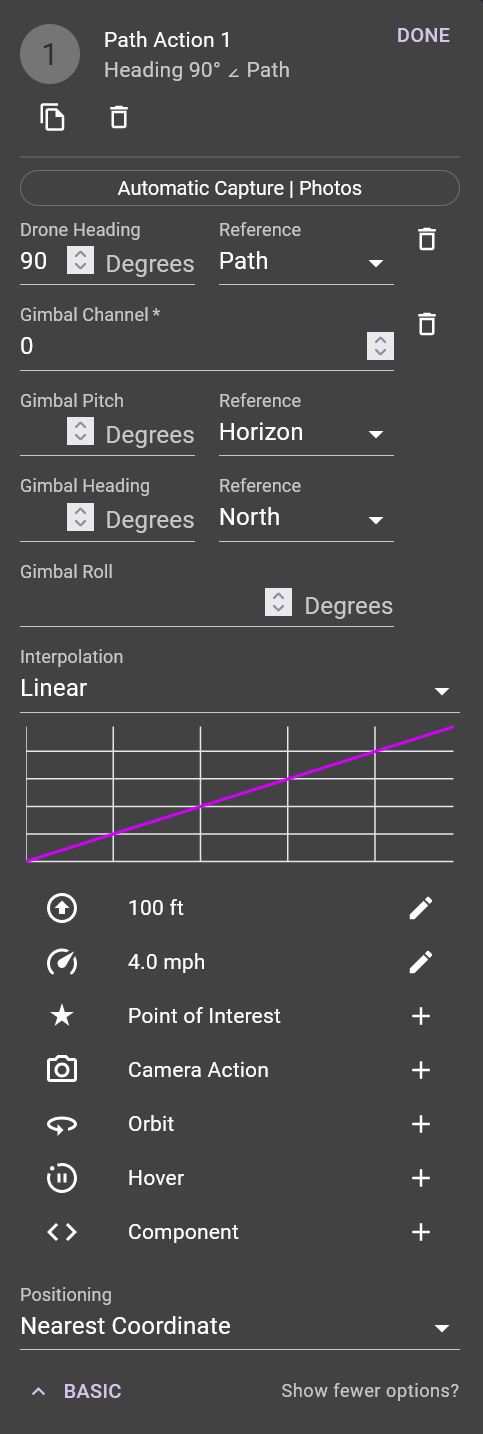
I have to confess I am struggling with the set up of the heading from path that Daniel mentioned. When I run the mission preview the camera is still pointing straight ahead. Drone heading matches your example and I have played around with different angle but they all point ahead...is it me?
It is possible that you have a heading somewhere else in the plan at a waypoint or path marker after that marker you have set to 90°. If not then Share the plan and someone can take a look at it. I’m having no issue setting a path marker set to 90° to path.
Hi Mike,
A tardy response but I haven't had the chance to respond until today. I figured it out in the end.
What I had not realised is that I had somehow set my Path Action half way around my curved rectangle. So the first half had no path action and the camera faced forward and then it hit the path action where the angles all changed. I also learned that you can click on the path action and drag it to wherever you want it - so I dragged it back to Waypoint A, ran the preview and bingo!
I would never have got this far without your input Mike, so a big thank you to you!
Good to hear you got sorted Paul, path actions are amazing things, it's surprising what you can do with multiple ones if you play around 👍
Your welcome Paul. As Martin stated path actions are an amazing way to utilize many of the functions and with multiple actions you can do a lot to get precise control. Easiest way to understand what functions are available at path actions and how they will work is to create a few test plans in the Web app. Then try things like heading, speed, altitude or any other supported function and then run the mission preview to see how they work. The more time you spend testing them the more you will understand how they work and more than likely will utilize them more. Enjoy.
Please sign in to leave a comment.